Showing posts with label Smokey Eye. Show all posts

Monday, November 19, 2012


The Body Shop always come out with lustworthy Christmas items, this year, out of all their offerings, christmas scented body butters, shimmer atomisers and powder pearls, what caught my eye was the Smoky Eye Palette in Smoky Copper. A warm eyeshadow quad, perfect for a smokey eye lover like myself.


The eyeshadows themselves are rich and creamy, a really lovely buttery formula and the beautiful colour transfers onto the eyes and looks beautiful. They aren't the most blendable formula around but that's nothing that a Mac 217 brush doesn't sort out - a little blend at the edges works perfectly. The lasting power is what you would expect from high end eyeshadows and despite the gorgeous satin finish I'm pleased to report they didn't crease after a long day! 


It's lovely seeing decent eyeshadow brushes in a eyeshadow palette, the liner brush is particular is fantastic which makes a massive difference compared to the usual doefoot applicator provided in most eyeshadow sets. 


I've been pairing it with a Metallic Eye Definer Pencil in Copper Brown, a warm bronze colour, which is really creamy and doesn't tug against the eyes despite it not having particularly good lasting power on the waterline. 


The Smoky Eye Palette Palette will set you back £14, which I can't fault at all - four lovely shades that are buttery soft included with two more than decent brushes! The Body Shop Christmas is available here and the Smoky Eye Palette is available here. Will you be visiting The Body Shop this Christmas?
Monday, September 17, 2012


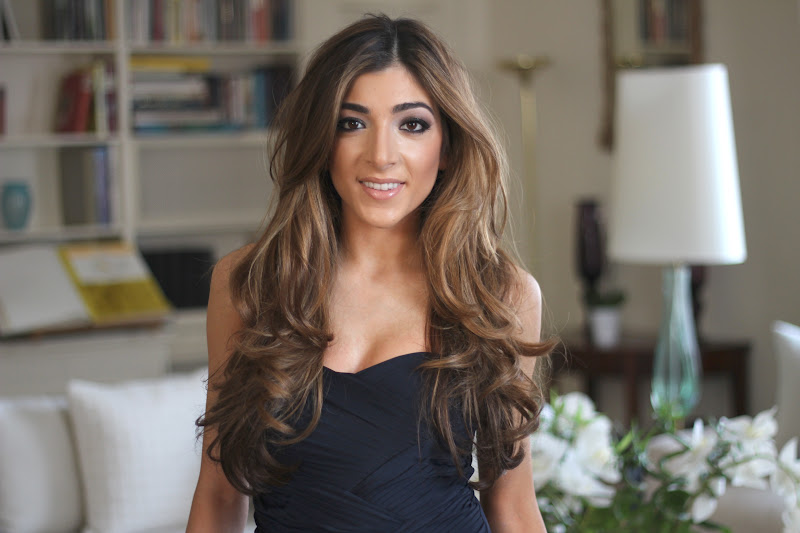
Just the word party ensures some sort of smokey eye is involved, which no doubt it was, and little more intense than I usually go. I opted for black as opposed to brown, to add some drama to my eyes. Using L'Oreal Infallible Eyeshadows, which are truly incredible. Unbeliveably pigmented, so rich, creamy and blendable - I just wish they were available in a wider range of shades. Back in May at the Cannes Film Festival Cheryl Cole wore a beautiful nude lip that complimented her smokey eye perfectly - L'Oreal Rouge Caresse in Nude Ingenue and  L'Oreal Glam Shine Fresh in Aqua Grapefruit was the combination she used so I jumped on that bandwagon too, joining in on the amazing nude lip pair!

Skin
- For party ready skin I always opt for a primer, ensuring that my makeup lasts all evening. Here I reached for Estee Lauder Matte Perfecting Primer (post here) which was followed by my foundation of choice, Giorgio Armani Luminous Silk as it's perfect for photos and lasts amazingly throughout an evening
- Sleek Contour Kit was brushes through my cheekbones for added definition while a touch of Mac Blush in Well Dressed was added for some colour

Eyes
- I primed my eyelids with Mac Painterly Paint Pot to help eyeshadows adhere to my skin and help their pigments appear more vibrant
- I used L'Oreal Colour Infallible Eyeshadow (post here) in 12 Endless Chocolate all over the lid and intensified the look with the shade 14 Eternal Black, followed by lashings of Max Factor False Lash Effect


Lips
- The Cheryl Cannes nude lip combination of L'Oreal Rouge Caresse in Nude Ingenue and  L'Oreal Glam Shine Fresh in Aqua Grapefruit 

Are you a smokey eye girl or do you prefer keeping it simple?

Monday, August 20, 2012

Photobucket

When it comes to an evening makeup look smokey eyes are what I favour. No surprises here, but in holiday time where I'm cutting back on makeup I tend to apply something a little lighter and more summer appropriate, nothing like this makeup here. I do like to have a little eye makeup on, especially for the evenings and this look is perfect for something a little natural yet smokey at the same time.

For my skin I've been loving some added glow curtsey of Mac Style blush and a recent Sephora purchase, Smashbox Fusion Soft Lights in Baked Starburst. The combination of the two makes it look as though I've been in the sun for days when really I've been hiding behind a hat and factor 30-50.      ;)


Skin
- Sprayed on a light layer of Dior DiorSkin Airflash Foundation which I've proclaimed my summer saviour (review here) followed by Mac Style Blush and Smashbox Fusion Soft Lights in Bakes Starburst


Eyes
- Chanel eyeshadow duo in 37 Sable - Emouvant, which is from their summer collection and is just a simple easy set perfect for creating a smokey eye. I then lined my upper lash line with Eyeko Skinny Liner and applied another recent purchase of mine, Make Up For Ever Smokey Lash Mascara, which I don't think does anything too spectacular. Just lengthens and adds a touch of volume, nothing as much as Giorgio Armani Eyes To Kill or Max Factor Mascaras. 

Lips
- Of course, what did you expect, Chantecaille Brilliant Gloss in Lucky! I'm almost out of this stuff which would mean a huge record for me, the first lip gloss I've ever finished!

Hope you're having a great week!

Monday, July 9, 2012


When it comes it eyes a smokey look is one that I favour. I've never been one for dramatic cat liner and red lips, and recently I've been re embracing my Urban Decay Naked Palettes. Here I used the Naked Palette 2, which is their most recent release. In terms of preference I will admit that the Naked is my one of choice, purely for the range of matt and frosty eyeshadows whereas the Naked 2 contains more frosty shades. There were three shades I wanted to make use of, all of which were in the purpley plum tones, the colours weren't a million miles away from the shades I usually go for but out came the blending brushes to create a smokey eye!

I always start my smokey eyes with applying a primer, Mac Painterly Paint Pot being the usual one of choice for its colour correcting abilities as well as helping eyeshadow colours become more vibrant.

1. Packing on the shade YDK all over my lid staying below the crease
2. Taking a fluffy blending brush, Mac 217, with the shade Tease and applying that through my crease for some definition
3 & 4. With a clean blending brush I make sure there were no harsh lines by blending where the eyeshadow met my skin, using winds wiper motions


5. Using a Maxfactor brush dipped in Busted eyeshadow I applied that along the outer half of my eye, again making sure to stay below my crease
6. Followed by blending with a Mac 217 to make all the colours fade into each other
7. With the shade Bootycall on the Urban Decay brush that came with the palette I applied the colour along my brow bone to act as a highlighter
8. Then continued to do the same in my tear duct and inner corner


9. Using a pointed brush dipped in the shade Busted I ran the brush along my lower lash line for some definition
10. Using Avon SuperShock Gel Eyeliner in Blackberry I messily lined my eyes making sure to stay close to the lash line
11. Followed by blending the line with the same pointed brush and the shade Busted


Other products used:
Skin
- Estee Lauder Matte Perfecting Primer which has been my primer of choice recently, more to come soon!
- For foundation I've been reaching for YSL Le Teint Touche Eclat Foundation for it's illuminating properties and gel like texture
- I didn't want to add any blush, just a light sweep of Bare Minerals Bronzer in The Deep End


Which Naked palette do you prefer?

Thursday, June 7, 2012


Wedding season. Makeup things to consider before slapping on some products...

1. Makeup must last from when the ceremony starts (in this case 5pm) to the early hours of the morning
2. Must be photo ready hence contain no SPF or light reflective particles
3. The ultimate challenge of staying shine-free while popping to the bathroom to blot & powder as little as possible 
4. Lastly, combining makeup with the outfit (aka what these 'Beauty On Location' posts are all about!) for example, with my bold red dress I personally would not pair that with a bold red lip.... Just the (yes, you guessed it) usual smokey eye and a nudey pink lip!

In this case, being a special occasion, I do tend to prolong the getting ready process by slapping on a few extra products than usual. This look contains my favourite pieces, the ones I know will deliver & can rely on, mostly 'luxurious' little goodies I don't tend to use on a daily basis.
Eyes
Seeing as smokey eyes get a bit messy I like to do them first as to not ruin the foundation. 

- Starting with applying Mac Painterly Paint Pot all over the lid as a skin tone evener/eyeshadow primer to ensure eyeshadow lasts all night
- I used a combination of two Dior 5 Colour Eyeshadow Palettes, Grege 734 and Royal Khaki 454. If I was ever stuck on a desert island and had to choose two eyeshadow palettes to bring with me, these would be it. They cover every shade I would need as well as being amazing quality
- As well as the two Dior Eyeshadow Pallettes I used L'Oreal Colour Infallible Eyeshadow in 012 Endless Chocolate, stay tuned for more on this - it's a goodie!
- For eyeliner I used Maybeline Eye Studio Lasting Drama Gel Eyeliner and blended that out with a matt black eyeshadow and a Louise Young LY13 brush
- I coated my lashes in Dior Lash Primer & Serum (link to post here) followed by my holy grail mascara, Giorgio Armani Eyes To Kill (link to post here)


Skin
- Outcome the trusty primer, the perfect one for me to keep me shine-free! Givenchy Mister Matt, aka my over 6 hour makeup saviour
- For foundation I used my trusty Giorgio Armani Luminous Silk (link to post here) for a photo ready base applied with what I call the 'Flawless Face Brush', Shu Uemura Goat 18 (link to post here)
- To conceal my horrendous dark circles I used Giorgio Armani High Precision Retouch (post here) and blended that into the foundation using my Beauty Blender (link to post here)
- Down the centre of my face I set my foundation using my damp Beauty Blender and Chanel Natural Finish Loose Powder (and kept the compact in my handbag for touchups!)
- To bronze up my skin and add some colour I used a matt bronzer, Guerlain Four Seasons in 01 Blondes just below my cheekbone and on my temples
- I mixed two blushers, Mac Well Dressed and Laura Mercier Lush Nectarine for some subtle colour and a girly glow

Lips
- I used a combination of L'Oreal Rouge Caresse in 501 Nude Ingenue followed by L'Oreal Glam Shine Fresh in 186 Aqua Grapefruit on top

Hair
- Done by the amazing Bruno Lotufo at Rosanno Feretti Salon, review & more information here

What products do you rely on for a party?

Monday, May 14, 2012


Whenever I don't have time to do a full on smokey eye before I go out I rely on my Mac Paint Pot in Constructivist - which I raved about fully here. I could never get rid of my paint pots, they are just the perfect base for eyeshadow, making them blend easier and last longer. This is just a really quick and easy way for an 'unkept' smokey eye look that I slap on when getting ready and time is limited!

1. With my finger I tap on some Mac Constructivist Paint Pot all over my lid making sure to stay below the crease
2. With a fluffy brush like the No7 Blend and Contour brush I sweep Mac Mulch Eyeshadow all over where I applied the paint pot to add to the colour


3. Using a different fluffy blending brush like the Mac 217 I blend the harsh edges out, in winds wiper motions, with a shade a couple of shades darker than my skin colour, Mac Cork eyeshadow 
4. Taking a pencil brush like the Mac 219 I apply some of the Mac Mulch eyeshadow under the eye

Continue to apply mascara and done with the eyes!


Wednesday, April 4, 2012


I recently picked up this Collection Smokey Eyes eyeshadow palette that contains 8 eyeshadows and 1 cream eyeshadow. There are 3 shimmer shades and 5 matt shades and the colours are very neutral with some browns, greys and pinks - perfect for creating a natural smokey eye! In this tutorial I'll be using the 3 shades in the middle row, a shimmery taupe, a brown and a light baby pink. This row reminds me of the Dior Smoky Nude palette which I love! - link. These eyeshadows do have a lot of fallout so I would recommend doing your eye makeup before anything else so you don't ruin your foundation! 
Collection Smokey Eyes Eyeshadow Palette middle row swatches


1. I always start with a primed eyelid to make eyeshadows last longer and have stronger pigmentation. Here I used the Trish McEvoy Eyeshadow Base in Bare
2. Taking a fluffy brush like the Mac 217 apply the light pink shade all over the lid staying below the crease
3. Using the darkest shade on a Maxfactor** brush apply the colour along the lash line


4. Blend the two colours together with a Mac 217, making sure there are no harsh lines
5. With my finger I dabbed on a bit of the shimmery taupe medium shade in the centre of my eyelid


6. Dab a bit of the cream eyeshadow into your inner tear duct to highlight your eyes and make them appear larger
7. To intensify the inner tear duct a bit more, layer the light pink shade over the cream eyeshadow with a Mac 217
8. Using whatever is left on the Maxfactor** brush underneath the eye to add a hint of colour


Other products used:


Eyes
- Trish McEvoy Eyeshadow Base in Bare followed by Collection Smokey Eyes Eyeshadow Palette and Collection Multiplier Mascara - which I love for more natural looking lashes, you can read my full review here

Skin
- As the eye makeup isn't too heavy I wanted to keep the rest of my face looking natural too by using Collection Naturally Matt Foundation and Laura Mercier Secret Camouflage under my eyes with a bit of Mac Harmony Blush on the cheeks

Lips
- L'Oreal Caresse in 01 Fashionista Pink followed by Collection Lock n Hold Lipgloss in Body Pop 1

Collection Smokey Eyes Palette is £4.19 and available here or at boots here

Monday, March 26, 2012


Two little pots that got me through this past holiday season (seems so long ago!) were the Chanel Illusion D'Ombre in 83 Illusoire and 85 Mirifique that together created a perfect glittery smokey eye. Normally paired with some sort of black dress for all the Christmas & New Year parties! I love using these cream shadows as they are so easy to work with, don't crease & don't loose pigmentation. Below is a step by step guide of how I created this look and other products I used!


Note: It is best to use synthetic brushes with these cream eyeshadows!
1. I always start with a primed eyelid as this will give the eyeshadows something to adhere to and make them last longer. Here I used Mac Painterly Paint Pot
2. Using a No7 Eye Colour Brush pack the lighter shade, Illusoire onto the lid, staying below the crease
3. Taking a fluffy blending brush like the Real Techniques Base Shadow Brush blend in windwiper motions where the eyeshadow stops to make sure there are no harsh lines


4 & 5. Taking a thin flat brush like the Jemma Kidd Pro Concealer Brush and the darker colour, Mirifique, shade the outer half of the eyelid bringing the eyeshadow up in the outer corner, just above the crease


6. Taking the same fluffy blender brush, Real Techniques Base Shadow Brush, blend the two colours together
7. Use whatever product is left over on the Jemma Kidd Pro Concealer Brush underneath the eyes, stopping where eyelashes stop


The finished look!


Other products used:


Eyes
- I used a fantastic really black mascara that I love, Max Factor False Lash Effect Fusion and of course the Chanel Illusion D'Ombre in Mirifique 85 (black) and Illusiore 83 (taupe)


Skin 
Not wanting to take away from the eye makeup by overdosing on blush or shimmer I focused on matt natural products
- Dior Diorskin Nude Fluid Foundation buffed in with a Jemma Kidd Pro Flat Top Foundation Brush
- As Vichy Dermablend Foundation stick gives such full coverage I actually use this to conceal under my eyes as it doesn't contain any light reflective pigments
- Using the matt dark shade from the Sleek Contour Palette to contour my cheeks and add some colour


Lips
- I love the nude lip smokey eye look so I paired my smokey eyes with Revlon Nude Attitude 01 followed by Tom Ford Lipgloss in Naked 01

Hope you enjoyed this post! :)

filed under: , ,